
F-Head
Table of Contents
Section outline
-
History of Machine Stitching – Precursors to Embroidery
Machine stitching began with the invention of the lockstitch sewing machine in the early 19th century, most notably patented by Elias Howe in 1846 and commercialized by Isaac Singer. These early machines used a reciprocating needle and a rotary shuttle hook to interlock a top and bottom thread, forming a stitch. The primary application was garment assembly, but the precision and repeatability of the stitch laid the foundation for automated embroidery.
Embroidery-capable machines evolved from these foundations by adapting the feed system to allow multi-directional movement of the fabric or hoop rather than linear feed motion. By the mid-20th century, pantograph-controlled machines could trace a pattern, and later CNC-style servo control allowed computer-guided decorative stitching.
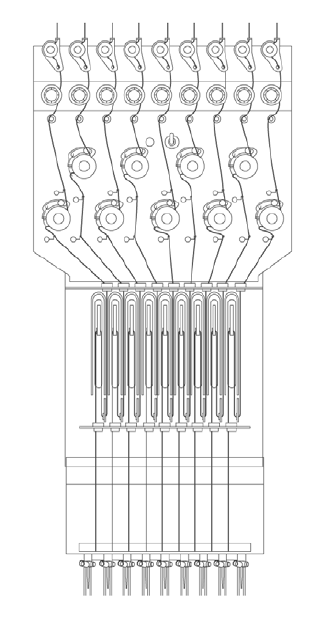
Above, showing an image of a traditional stitching head (F-Head)
Core Mechanisms of Machine Stitching
At the heart of most stitching machines is the lockstitch mechanism, formed by the interplay of:
- A needle carrying the upper thread
- A rotary hook (or oscillating shuttle) that loops around the needle to catch and pull the thread
- A bobbin holding the bottom thread
- A needle bar driving vertical movement of the needle
- A feed mechanism (in sewing) or pantograph/hoop movement system (in embroidery) to control fabric position
The thread take-up lever pulls slack thread after the stitch is formed, ensuring correct tension and preventing tangling.
Stitching Threads
There are a wide variety of different threads that work throughout the embroidery process as both upper and lower threads. These variations open many different material possibilities and technical capabilities. Thread quality including technical parameters such as twist per inch, denier, stock material, and lubrication factors are all important in the embroidery process and required to achieve optimal speeds and results.
Threads not designed specifically for embroidery can cause numerous thread breaks and other machine problems. It is recommended to use high-quality embroidery-grade thread. Standard embroidery grade is usually 40 weight; finer applications use 60wt, 75wt, or even 120wt thread.
Limitations
- Extremely elastic materials (like spandex) may cause skipped stitches
- Coarse or abrasive materials (e.g., fiberglass) can prematurely wear down needles and thread paths
- Heavy materials require higher torque and specialized needles; thin or sheer materials may pucker if tension is not properly tuned
What Has (and Hasn’t) Changed
Still the same
- The needle, needle bar, rotary hook, and thread take-up lever remain largely unchanged in function
- The lockstitch remains the foundational stitch in most machines, including commercial embroidery systems
What’s changed
- Servo and stepper motors now drive precise movement of hoops or frames
- Digital controls and CNC programming allow for image-based stitch design and automatic color changes
- Sensor feedback systems monitor thread breakage, hoop position, and thread usage in real-time
Mechanical Systems: Inside the Embroidery HeadKey mechanical components that coordinate motion and stitch formation include:
- Thread Take-Up Lever: Pulls back excess thread after each stitch
- Reciprocator: Drives vertical motion of the needle bar
- Rotary Hook: Spins around the bobbin to catch and lock the top thread
- Bobbin Case and Tension Spring: Holds and tensions the lower thread
- Catcher: Helps clear threads or trims in automatic trimming systems
- Trimmer Mechanism: Cuts threads at color changes or design end-points
- Jump Mechanism: Lifts the needle and shifts position without stitching
- Color Change Actuator: Moves the correct needle into position for multi-color embroidery
These components are synchronized via a combination of cams, timing belts, and digital controllers to maintain millisecond-level timing accuracy.
How a Needle and Rotary Hook Form a Lockstitch
1. Needle descends
The needle, carrying the upper thread, moves downward through the fabric. As it pierces the fabric and reaches its lowest point, the thread is pushed through, creating a loop just above the eye of the needle.
2. Rotary hook catches the loop
As the needle begins its upward motion, the rotary hook begins to spin. The hook's sharp point is precisely timed to intersect with the loop of thread formed behind the ascending needle, catching and pulling it around the bobbin case.
3. Loop is pulled around the bobbin thread
The hook guides the loop of upper thread around the bobbin case, effectively trapping the lower thread inside and forming the lockstitch.
4. Thread take-up lever tightens the stitch
As the rotary hook completes its rotation and the needle rises, the take-up lever pulls the upper thread tight, locking the stitch into the center of the fabric layers.
5. Feed mechanism moves fabric
While the needle is out of the fabric and the threads are tight, the feed system or pantograph/hoop moves the fabric to the next position. The process repeats at high speed for continuous stitching.
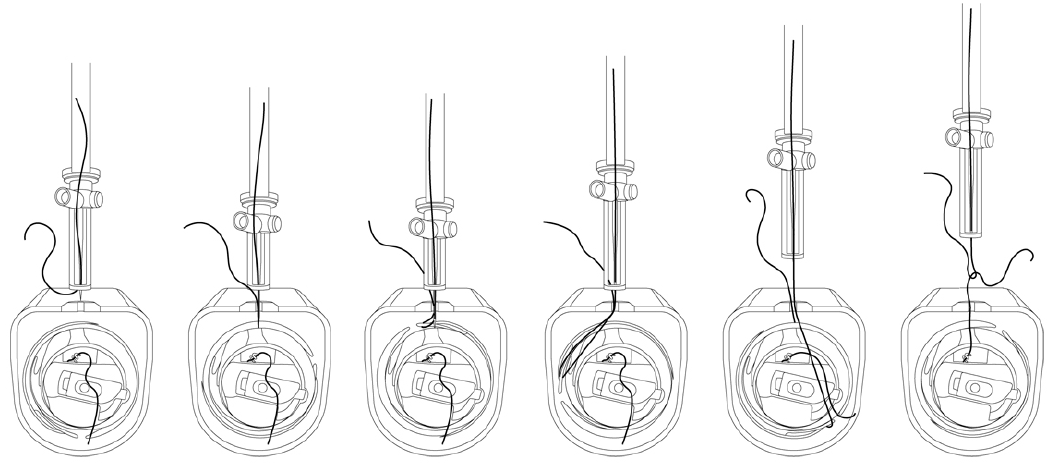
Above, showing the stitching process with top thread and bottom thread in the rotary hook.
Examples of technical embroidery threads:
- Polyester – Standard thread in a wide variety of colors and lusters
- Nomex – High temperature thread with self-extinguishing properties
- Kevlar – Strong thread resisting cutting, flames, and heat
- PTFE – High chemical resistance and very high heat tolerance
- PEEK – Resistant to extreme environments and chemicals
- Nylon – Melts under heat, used often in composites
- Dyneema – Extremely strong, low-weight high tenacity thread
- Cotton – Biodegradable and strengthens when wet
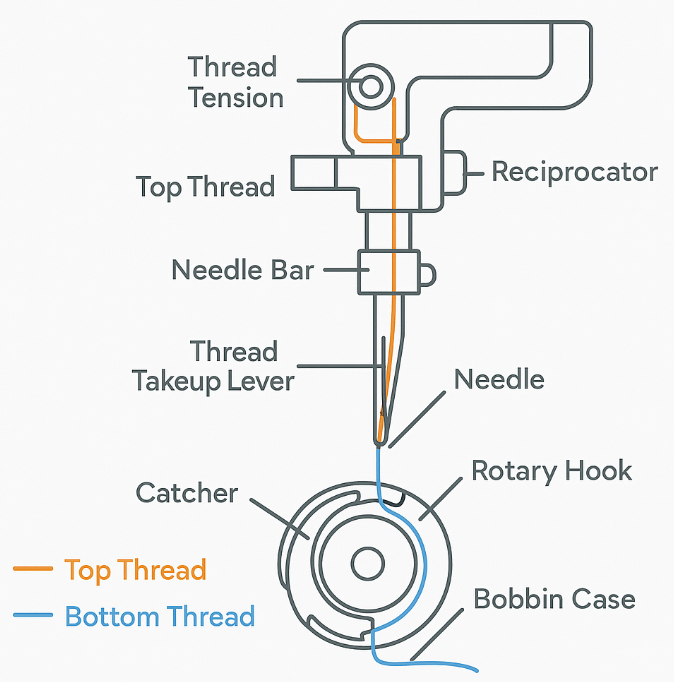
Key terms and diagram of the stitching assembly and threads.
Thread Tension Systems
Top Thread Tension
- Controlled by tension discs, springs, and pre-tensioners
- If too tight: fabric puckering, thread breakage
- If too loose: loops form on the fabric surface, inconsistent stitching
Bottom Thread Tension
- Set using a small adjustment screw on the bobbin case
- Must balance with the top tension for proper lockstitch formation
- Inconsistent bottom tension causes nests or loops underneath
Attachments for Stitching Heads
- Cording devices: Feed cords or yarns into the stitch
- Sequin and bead devices: Place decorative elements automatically
- Boring tools: Create decorative stitched holes
- Laser cutters: Inline cutting or etching of fabric
- Zigzag devices: Create width variation in stitches
- 3D puff guides: Help embroider raised effects over foam